6 apps and tips to virtually connect with your family – including for Christmas dinner

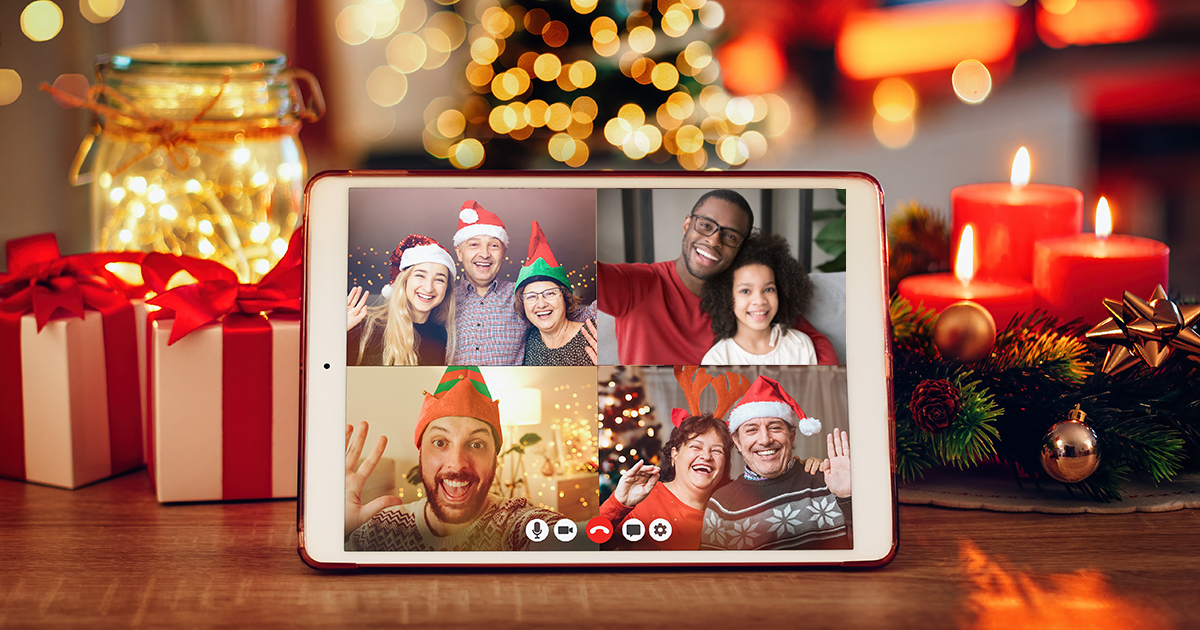
The holidays will definitely feel different this year by not being able to gather with friends and family. But that doesn’t mean that Christmas is cancelled! With the power of technology, you’ll still be able to hear your uncle’s dad jokes, or your cousin’s elaborate stories – it will feel as if they were seated right at the dinner table with you! We’ve compiled a list of video call apps and equipment to use, as well as some set up tips and tricks to help make this year’s virtual Christmas a memorable one.

Best Apps to use for Video Calling

With all the apps and services out there to choose from, it might be overwhelming to know which one to use. Below, we have broken down some great video calling apps, and what sets them apart to help you choose the right one for you.

Zoom
Zoom is an excellent choice if you have larger families, as you can call with up to 100 people using their free plan, although only for 40 minutes of video calling. It works on Windows and macOS (desktop), and Android and iOS (mobile). Click here for a Zoom how-to set up guide.

Facetime
Facetime is great for those Apple product lovers, as it works on all Apple devices such as iPads, iPhones and Mac computers and laptops. You can host a video call for up to 32 people. Click here for how to set up FaceTime.

WhatsApp
WhatsApp is a great choice for video calls when you have friends and family living across the globe. You can have up to 4 users, and the calls are on the phone’s data plan or via WiFi, so voice calls do not use up any of your phone minutes. It works on Windows and macOS (desktop), and Android and iOS (mobile). Click here on how to set up a WhatsApp group video call.

Skype
Skype is another great app to use, especially if you have family living in other countries. What makes it a little better than Whatsapp is that it lets you make free international calls online for up to 100 people for audio or video conferencing on any device (Hello, big virtual family gathering!) Works on Windows and macOS (desktop), and Android and iOS (mobile). Click here for how to set up a group chat in Skype.

Houseparty
If you love being the life of the party (or your friends and family do), you’ll love Houseparty. It’s a social networking app that allows up to 8 people to video chat at once in a “room,” plus you can also play games on it, such as Heads Up!, Trivia, Quick Draw and more! Works on Windows and macOS (desktop), and Android and iOS (mobile). Click here to learn more about Houseparty and how to set it up.

Facebook Messenger
Facebook Messenger lets you easily chat and video call with your friends and family. It’s great because most of your friends and family will probably already have it if they have a Facebook account, making it an excellent choice for those who aren’t as tech-savvy. Plus, video calls have a limit of 50 users. Works on Windows and macOS (desktop), and Android and iOS (mobile). Click here for how to set up Facebook Messenger group video chat.

Set Up Tips

Lighting
Of course, you’ll want to look your best when video calling with your friends and family, since someone might request a group screenshot to capture the moment. If you are using a laptop, set up a light source behind and above your screen. This way, your face will be nicely lit up and visible. Also, use lighting from multiple sources and angles, so that it is dispersed nice and evenly. This can help you avoid harsh shadows casting on your face or in the background.

Sound Check
Nothing is worse than not being able to hear your video caller, or them struggling to hear you. If you have a microphone plugged in, make sure your computer isn’t sticking to its default audio input device. Check by making sure your microphone settings on your computer are correct. You can check on a Mac computer by clicking the volume control in the menu bar and selecting “sound options.” In the “Input” tab, make sure that your external microphone is selected from the list. Once it is selected, ensure that the “Input level” bar is moving to show that the computer is picking up any sound. Lastly, check that the volume slider isn’t all the way down.

If you’re using a PC, right click the volume icon in the taskbar and select sounds. Choose the “Recording” tab and choose your external microphone from the list. If you are using you computer for the first time or it is fairly new, you can select “Set up microphone” to go through the Microphone Setup Wizard.

Go Hands-Free
If you don’t have a laptop and will be using your phone, instead of awkwardly propping it up on your table, use a mini or table top tripod. This way, you can eat or do other things while you chat with friends and family. As well, many tripods have convenient, bendable legs that you can securely place on any type of surface or wrap around anything, like a floor lamp post.

Tidy Up!
Lastly, if you’re planning a big family video call, make sure the space in the background is somewhat tidy. The last thing you want is a big pile of dirty laundry sitting in plain sight, or the dishes you forgot to put in the dishwasher the night before on the counter behind you. It’s not the end of the world, but it might save you some embarrassment!

Take it to the Big Screen

If you have your set up ready to go, take it one step further and run your video calls through your TV screen! It is a lot better than hunching over a laptop or trying to see everyone on a tiny mobile screen. If you have any Apple or iOS devices, use a Lightning-to-HDMI adapter. Just plug the adapter into an HDMI cable, hook the cable up to the TV, and switch to the appropriate input.

If your laptop has an HDMI port, you can also simply plug an HDMI cable from the laptop straight into your TV. For newer Macs and Windows PCs with USB-C ports, you can use a USB-C to HDMI cable. Once you have plugged it in, press Windows-P on a Windows laptop to switch between display modes. Choosing “Second-screen only” will disable your laptop’s screen while it’s connected to the TV.

BONUS TIP: If you own a camera, you can also check out our blog on Using Your Camera as a Webcam | How-To Guide for Better Video Calling at Home.

We hope you found this blog helpful on how to virtually connect with friends and family over the Christmas holidays. From choosing the right video call app or service, to setting up, and even using your TV for enhanced visual and sound, it will feel like your loved ones are right there with you!

Elevate Your Photography – Food Photos at Home

While spending more time at home, have you found yourself enjoying the art of cooking or baking more? If so, you are not alone. A quick scroll through any social media feed and you’ll see everyone is cooking up a storm. If you want to capture your home creations in photos, we are here to help. We’re sharing 3 concepts to improve your food photography using your phone, a piece of paper and natural light, and it won’t interfere with enjoying dinner!

Follow along to learn how to elevate your food photography beyond the snapshot by considering content and framing, staging, and lighting. The examples below were all shot with an iPhone 11 and available light.

1. Content & Framing

What makes the images above different? The image on the left looks busy with all the counter items distracting focus from the food. To make your food photos shine, consider everything that is present in the frame. Ask yourself if something is required to tell the story, and if so, how does it interact with the rest of the items. A clean background will allow the food to stand out.

In the above right, you see the image is taken at a ¾ height with the salad as the prominent item, and the sandwich slightly out of focus in the background. You can also take an overhead shot looking straight down depending on how you feel the plate will come to life best. For an overhead shot, you will want to consider the surface it will be on, and any items that are visible. There are many other angles you can do, and if using an interchangeable lens system, a macro lens will allow you to get in to capture up-close details. For this blog, we will keep it to phone photography.

2. Staging

When plating your dish, carefully craft your plate. Examine the above two images. Notice the sandwich is cut differently, and in the left it is stacked and has some unnecessary items in the frame, whereas the right is side by side.

Consider how the elements of the dish appear together. On fancy cooking shows, or at high-end restaurants they always take great care in the presentation, and at home should be no different. A simple bowl of spaghetti can be twisted in a circular motion vs dumped on a plate. These small details will go a long way to help the visual presentation. Once you have your plate ready, make sure there are no unintended fingerprints, or drips on the rim of the plate, and then it’s time to set up your shot.

3. Lighting

Lighting is what will make or break the image. In all photography, the easiest way to improve is to learn how light behaves, how to manipulate it and control it. We will be using only available light for this tutorial.

Your camera has a built-in white balance. Mixing natural and artificial light will create colour casts of warm (yellow cast) and cool (blue/cyan cast). This is due to the different light temperatures of the light sources. It is better to use one or the other to avoid various colour casts in your final image.

In the two images above, the available light sources are from a window on the left side and an overhead light. In the left image, the overhead light is on and in the right image, it is lit only with the window. Notice how the colour is more balanced using a single light source? In the left, there is a yellow glow in the plate and a harsh shadow from the mug. The lighting in the left image is more balanced, but the shadows are still too dark.

To fill our shadows and help balance the light in the right image above, we will use a white piece of presentation board. Any white surface can work with varied results, from a sheet of printer paper to a white paper box. Get creative with what you have around the house. Place the white paper beside the object, on the opposite side from the window. This allows the light to reflect back on the subject, and fill in that shadow. Move the card around at different angles, and watch how the light changes on the plate.

Putting it all together

Next time you make something tasty in the kitchen, consider these 3 points and watch your food photography come to life! By taking a minute to consider your image content and framing, staging, and lighting, you can craft photos as beautiful as your kitchen delights are tasty. Below is a comparison of different outcomes with the lighting conditions described above.

1 – Background untidy, 2 – Naturally lit with overhead artificial light, 3 – Naturally lit, 4 – Add white card, 5 – Result with white card

Be sure to consider bringing your new home chef images to life. A homemade cookbook is great for future generations to preserve your unique and tasty recipes. Our Photolab makes book-making easy, and with your new food photography skills, your cookbook will be loved by all.

13 Back to School Problems SOLVED

The new school year is now underway, and if you’re struggling to fully adjust, you’re not alone. It can be a stressful and busy time of year. To help ease into things this September, here are 13 tips to solve common issues you might be experiencing with the kids now back at school.

Problem #1

Tough Mornings: The days are getting shorter, so the mornings will be getting darker.

Solution: Wake up ready to take on the school run with the Philips Wakeup Somneo Light. It will wake you gently with a simulated sunrise that’s clinically proven to help you feel more rested.

Problem #2

I don’t have enough computer storage space: Too many kids shows taking up valuable storage space and there’s not enough room on the computer’s hard drive for their study projects.

Solution: A good external hard drive is the answer. Take a look at the Seagate Expansion Portable 8TB hard drive or the Transcend 4TB StoreJet and free up some of those valuable gigabytes.

Problem #3

Protecting your computer: The kids are a little less than delicate with their tech equipment.

Solution: The sturdy Asus C202SA Chromebook has been designed to withstand rough-and-tumble handling. It has a robust rubber-wrapped protective guard, it can survive a “drop test” from a height of 3.9 feet, and it can repel up to 66cc of liquid.

Problem #4

Too many bags, not enough hands: How can kids carry it all?

Solution: The Targus 17″ Voyager Laptop Backpack not only has a top-loading padded notebook section that can accommodate notebooks with up to 17” screens—it also has a large front cooler compartment for convenient food storage.


Problem #5

I don’t know anything about tech: How am I supposed to know what to buy?

Solution: London Drugs’ friendly tech experts are available in store to discuss technology needs for students. Ask them about laptops, portable memory devices, Bluetooth wireless headphones, software and accessories.

Problem #6

I don’t have time to shop: I’m too busy to go to the store.

Solution: Shop from the comfort of your home online at LondonDrugs.com and have your order ready for pickup in-store within two hours. London Drugs also offers free standard shipping on orders over $75.

Problem #7

Tired eyes: I worry about how long my kids are staring at screens.

Solution: The Asus 31.5inch Curved Monitor has a blue light filter that protects eyes from harmful blue light. It emits low blue light levels and is certified flicker-free. Add to that 25% sharper images and up to 77% more onscreen space – and you can see why this is the crème de la crème of monitors.

Problem #8

Restless kids: Are your kids bored of studying in their rooms?

Solution: Let them study on the go with the Samsung Galaxy Tab S4. Its fast processor and expandable memory provide an efficient platform for multitasking. It even comes with an S pen that never needs to be charged. Or choose an 11-inch Apple iPad Pro with its all-new, all-screen design to get the most from working on the go.

Problem #9

I don’t know what to do with old devices: How do I recycle?

Solution: Students upgrading electronic devices can recycle their old devices through London Drugs’ What’s the Green Deal? in-store comprehensive recycling program.

Problem #10

My house is noisy: The kids can’t focus on the podcast or play they need to listen to.

Solution: Treat their ears to some JVC Bluetooth Noise-Cancelling On-Ear Headphones. Bluetooth wireless technology lets them pair their smartphone or tablet for easy access to their saved playlists, while noise-cancelling technology helps block out all the noise fellow family members are making.

Problem #11

My kid’s workspace is boring: How can I brighten up their study area?

Solution: Great for homework, to-do lists and doodling, the Quartet Glass Desktop Dry-Erase Pad is fun and functional. This frameless desktop pad adds a convenient feature to any workspace and doesn’t stain, scratch or dent.

Problem #12

Busy lives: Trying to fit in time for family fun.

Solution: Try these cool retro Arcade 1Up Games, fun for almost any age. Relive the glory days of arcade gaming in the comfort of your own home with the family.

Problem #13

Back to school is expensive: And I don’t want to pay more than the other parents.

Solution: Keep costs low and get extra peace of mind with London Drugs’ price match guarantee.

6 Things You Didn’t Know About Your iPhone

The iPhone may be the most common smartphone in Canada, but that doesn’t mean we all know how to use our iPhones. Behind the simplicity of iOS lies incredible complexity, so we’ve decoded some of the best tips. Here are 6 changes you should consider making with your iPhone habits.

15415264281_f99cd63d21_z

READ MORE