Change Your Lens, Change Your Perspective

May 13 Newsletter

One of the best things about vacations is that they allow you to shift your perspective. Sometimes it’s just a slight adjustment, and sometimes it can be a sea change, depending on where you go and what befalls you while you’re there. But every vacation moves you in some way, which is part of their awesomeness—and their necessity. The human mind needs to be refreshed once in a while. A change in perspective is a change in thinking. Or maybe it’s the other way around.


The thing about this kind of perspective shift, however, is that it typically fades away over time. In the weeks and months after you return from your vacation, real life has a way of steamrolling everything back to normal—including your thinking.

READ MORE

Tech Talk: GoPro

If you haven’t already heard, GoPro’s are the next big thing and London Drugs has all the accessories and items you need to capture the perfect video. On Monday, April 20th, London Drugs tech expert David Levett sat down with anchor Darrell Rumold on CTV Morning Live in Regina to discuss the latest GoPro and some of the newest accessories to go with it.

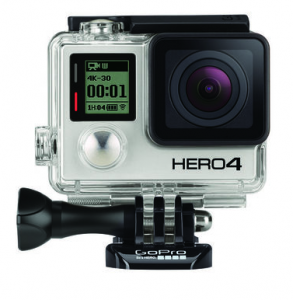
The GoPro HERO4 Black is the most advanced GoPro ever. It features improved image quality and a 2x more powerful processor with 2x faster video frame rates. The high-resolution 4K30 and high frame rate 1080p120 video  enables a stunning, immersive footage of you and your world.gopro hero4 black

David discussed a few of the accessories that can be paired with the GoPro HERO4. The GoPro Scenelapse is a mount for the GoPro that gives a 360-degree panorama. David suggested attaching the mount to the top of a car to get a perfect circulating shot. For those that are interested in seeing what the world is like from their dog’s point of view, they can purchase the GoPro Dog Harness. David explained how individuals would be surprised by the images their dog’s see by simply attaching their GoPro to their pets.

For those that are into other activities such as target shooting, David suggested to check out the GoPro Gun Mount. Individuals can attach their GoPro to the end of their shotgun to document their target shooting. Or, for those that are into documenting the social events with their friends, the GoPro Selfie Stick is perfect for their social gatherings. The selfie stick gives individuals the ability to take photos of himself or herself with more than one person.

Solo_White_AngleHowever, the latest accessory to come into London Drugs stores that will take your GoPro filming to the next level is the 3DR Solo Drone. The Drone has the ability to take GoPro’s up to 400 feet and can be controlled as far as a mile and a half away from your starting location. Individuals can tap into the GoPro camera attached to the drone from their smart phone, giving them a bird’s eye view.

The GoPro and its accessories can be used for a variety of activities. Whether you like to document taking your dog for a walk, or view your house from 400 feet in the air, the GoPro HERO4 has accessories to give you what you need with a high quality, durable camera. Make sure to check out all the different GoPro accessories here.

Tech Talk with GoPro and 3DR Drone

If you haven’t already heard, GoPro’s are the next big thing and London Drugs has all the accessories and items you need to capture the perfect video. On Monday, April 20th, London Drugs tech expert David Levett sat down with anchor Darrell Rumold on CTV Morning Live in Regina to discuss the latest GoPro and some of the newest accessories to go with it.

READ MORE

Exploring Fall Through a Filter

Autumn is a fantastic season for photographers, with bold natural colours, dynamic storms, and spectacular migrating birds and wildlife. With the natural world on dramatic display, this is the perfect time to experiment with filters.

Filters are a simple, inexpensive way to add punch to your photography. Fitting right over your favourite lens, filters change the way the light hits your image sensor.

Lovely landscapes
Imagine a gorgeous autumn vista, with rolling hills ablaze in red, orange, and gold. The sky is a clear bright blue dotted with puffy clouds. The challenge with this landscape—and most landscapes—is that the land and the sky require different exposures to capture them at their best.

Graduated filters will transform the way you shoot landscapes. The filter blocks out more light rays in the top half, and fewer toward the bottom. Your landscape will be bright and bold, with a crisp and detailed sky.

Cool Days, Warm Skin Tones
Red-cheeked kids in the pumpkin patch, a family game of touch football, or an autumn hike in the woods: the colours of the Canadian autumn form a brilliant backdrop for your family photos. When you are photographing people outdoors, consider using a sky filter. This filter has a pink tint that will add lovely warmth to your photos, enhancing the fiery fall colours and brightening skin tones.

Filter Over Troubled Water
Water in the autumn can be breathtakingly beautiful, with flat lakes reflecting bright foliage, a stormy ocean, or a tumbling river. Photographing bodies of water, particularly on bright days, can cause haze or glare. A polarizing filter blocks out errant light rays, resulting in clear, crisp shots. Many photographers leave a polarizing filter on their cameras all the time.

Beautiful Blur
A neutral density filter doesn’t look like much—just a plain, grey filter that blocks out light rays evenly. But lowering the amount of light that hits the sensor allows you to slow the shutter speed and achieve an artistic blur of movement. Streams and waterfalls are wonderful test subjects: with the filter in place, you can get a perfectly exposed shot of the rushing water.

Your London Drugs Camera Department carries a variety of filters for different makes and models of cameras. Bring your camera in and we can help you choose the perfect filter to take gorgeous autumn shots.

Home Studio Essentials: Preparing for a Portrait Photo Shoot

Studio portraits capture people at their very best—bright eyes, luminous skin, and gorgeous details that bring out the unique personality of each person. Professional photography studios carefully control their lighting using a few basic principles. With a little planning and some strategic purchases, you can quickly set up your own temporary studio and take gorgeous portraits of your loved ones.

Studio Lighting Basics
When you look beyond the high tech equipment, a professional photography studio is simply a space with well-controlled lighting. Each lighting element has a specific purpose.

The main light
Placed above the subject and at an angle, the main light is the primary source of illumination. These lights often have an umbrella behind them to help direct the beams at the subject.

Your ideal main light will be strong, yet diffuse, the indoor equivalent of a cloudy daytime shot. You may have a room with a lot of natural light, or you can use an artificial light like a very bright lamp or a studio lighting kit. Quick to set up and simple to use, a studio light can give you the freedom to photograph in any room, at any time of day.

The fill light
A strong main light will create harsh shadows on the face, so studios will use a soft fill light to illuminate the dark side of the face. There are some tricks you can use at home to get the same effect.

Try using a soft box on your main light. A soft box diffuses the light rays through a large, softening surface area. There will be fewer harsh shadows on your subject’s face, reducing the need for a fill light.

Instead of a fill light, use a reflector. A reflector can be any flat, white surface that is angled to bounce the main light onto the shadow side of the face. You can use a large piece of white cardboard or foam core. Professional reflectors are collapsible and come with different surfaces that will subtly change the colour tones of the reflected light.

The back light
Shadows on the backdrop will distract from the portrait, so studios illuminate the backdrop as well. You can do this with small lights angled upward against the backdrop, or you can move your subject away from the backdrop. This larger distance will cast the shadows out of the frame. Take some test shots to find the perfect set up.

Tips and Tricks

Focus on the eye—Always focus on the pupil of the eye. This is the sharpest feature on the face, and will ensure a clear, bright-eyed portrait.

Shoot with a wide aperture—A wide aperture gives you a shallow depth of field. This means your subject will be in focus, with the background pleasantly blurred.

Use a tripod—For clear, sharp portraits, a tripod is essential. Knowing the location of your camera will allow you to precisely control lighting and other visual elements. You will also eliminate handshake, which happens to the surest of photographers.

Consider your backdrop—There are very few places in a home that have both an attractive, distraction-free backdrop and perfect lighting. We recommend finding your best lighting conditions, and adding a simple backdrop that will not compete with the portrait. This can be as simple as a smooth white sheet hanging against the wall. You can also purchase a portable backdrop frame that can expand to 9’ wide by 12’ high, perfect for group portraits. Use your own fabric or paper backdrop, or purchase them ready-made.

Shoot in RAW—Portraits are perfect for shooting in RAW. You can carefully manage white balance and exposure on your computer. Since your lighting conditions will be exactly the same in any given photo shoot, you will be able to correct the white balance for all your shots in one batch.

London Drugs can help you find the best home studio products for your needs. Drop by our Camera Department and our LDExperts can help you out.
Capturing the Summer Landscape

From day trips to camping trips, summer is the time to get away from it all. And everywhere you venture, there will be a gorgeous landscape that begs to be photographed.

Photographing landscapes is tricky. When you hike up to the lookout point and take it all in, you are looking at a vast three dimensional space. Translating that sweeping vista into a rectangular, 2-D photo often results in an underwhelming shot, flat and uninteresting, without the breathtaking quality of the original.

The key to vivid landscape shots is composition. Every photograph is made up of shapes and lines, focal points, backgrounds, and foregrounds. Our eyes don’t consciously register these elements; instead, the photo’s composition forms a road map to the image, telling our eyes where to look next.

Here are some simple tips to get you thinking about composition, so you can take more dynamic landscape photographs this summer.

  1. Find a focal point. In real life, a sweeping landscape is mesmerizing because it fills your visual field—everywhere you look, your eyes drink in vast beauty. In a photograph, your eyes need a place to rest. Find an interesting focal point that stands out: a boat on the water, a twisted tree trunk, a red barn in a field of waving wheat, anything that catches the eye.
  2. Eliminate the details. Once you have your focal point, squint your eyes a little. The human eye searches for detail, so the larger elements of colour and shape can escape you. Look for shapes, lines and blocks of colour. How do these elements relate to your focal point? Move your camera around so the focal point is located in different spots within the frame. Where is it the most interesting?
  3. The rule of thirds. Instead of placing the focal point smack dab in the middle of the frame, consider the rule of thirds. Imagine a tic-tac-toe grid over your image. The four intersections of the grid are the spots where our eyes naturally rest. Try placing your focal point on one of these intersections—this simple trick makes the image more visually dynamic.
  4. Look for lines. A line can be anything—a winding road, a stream, or a shoreline. Visually, lines guide the eyes and tell them where to go. When you are framing your shot, think of how your line relates to your focal point—does it lead to it? Does it distract? Play around with framing until your elements seem balanced.
  5. Look to the horizon The horizon is a natural line that needs a little special attention. Make sure the horizon is level in your shot—you can fix this with editing software after the fact, but it is simpler to line up the horizon first. Also, remember the rule of thirds. Your photo will look better if your horizon is along the top third or the bottom third of the photo. Shoot it both ways, and see which you prefer.
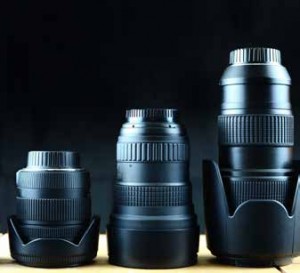
  6. Have fun with foreground The foreground is an important part of your landscape photo—it grounds your image and provides a context for the rest of the shot. Try using a wide angle lens and getting close to your foreground. A wide angle lens distorts perspective, so objects that are closer to the lens appear much larger, proportionally, than items farther away. Shooting a landscape through a field of wildflowers would make the wildflowers appear bigger than the trees in the distance, emphasizing the distance between those objects.
  7. Dawn and Dusk: The Golden Hours The golden, angled light of dawn and dusk can add drama to nearly any landscape. If possible, plan your photo session so you can make the most of this gorgeous natural light.

The beauty of digital photography is that you can play with composition by shooting dozens—even hundreds—of frames. Experiment with different focal points, different framing, different foregrounds, and see what works best. As you begin to consider the elements of composition, your photography will begin to capture the feeling and mood of looking at the landscape with your own eyes.

Photobooks: Your Summer Travelogues
Photobooks are the ideal way to tell your summer stories in pictures. Inexpensive softcover books are a popular choice for sharing travel snapshots—many customers put together a book for each summer of camping trips, or devote an entire book to a special vacation. Our larger hardcover books are ideal for displaying your most beautiful landscape shots.

Photographing Wildlife: A Gadget Guide

Canada is a paradise for nature-lovers, especially those who love to capture wildlife in gorgeous, dynamic images. From national parks to local bird sanctuaries, most Canadians live just a short drive from great wildlife-viewing areas.

READ MORE

« Previous Page Next Page »