Make digital memories last even longer.

gillianshaw_photo


You’ve taken some great travel pics – Now what?

Let the experts at London Drugs help you to store your pictures safely both digitally and in a beautiful photobook.

photosaveVerbatim Photosave DVD-R
Verbatim PhotoSave DVDs feature integrated software that launches automatically when the disc is inserted into a DVD-R drive. The process of searching for photos is also automated so users only need to click on the record button to save their memories from a PC. Highly versatile, the unique discs can be used to find and save photos from a hard drive, camera, memory card or a USB drive and will recognize more than 80 different photo file formats.


clickfreeClickfree Backup Drive
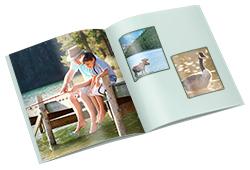
Just plug it in and backup begins. Automatically finds and organizes all your photos and other personal files. Complete personal file backup can easily be restored to a new computer. Available in various sizes.


photobookPhotobooks
Let us help you publish your photos like a professional with our Moments Photo Books. Customize with backgrounds, text and layout to create a truly personal book that can be shared with friends and family.


Tech Talk – Back up, share and access your files anywhere

How to access all your music, movies and photos from any computer, tablet or smartphone with the new Pogo Plug mobile and V4.

New Pogo Plug Tech Talk with Julian Sanders from London Drugs. Take an external hard drive and make your own cloud. Pogo Plug makes it easy. Apps for your smartphone to access and backup your photos, movies, music and more from anywhere. Put a media collection on a huge hard drive connected to your Pogo Plug and access it all from your tablet. Never worry about storage limits again. Painless and easy backup too.

Tech Talk – High Tech Gift Ideas

Julian Sanders from London Drugs talks about great high tech gift ideas including tablet accessories, bags and even remote control helicopters.

Don’t Lose Your VHS Memories

Here’s a sad situation. You have a family get together, and want to reminisce about first birthday memories caught on video. You unearth the VHS tape you’ve been carefully storing all these years and pop it in the old player—the player that’s been banished to the spare TV in the basement because it was replaced by the DVD player a few years ago. Sadly, the first birthday moments of your kids are marred by noise and blips and other signs of degrading video tape.

VHS tape lasts between 10-15 years, if stored properly, while DVDs can last a lifetime if properly stored.

Here are some other solid reasons to transfer your video tapes:

  • Space—DVDs and cases take up a fraction of the space of those clunky VHS tapes
  • Duplication—Now you’ll have an original you can make copies of for family members
  • Fun—Since the tape is transfered to DVD in an editable format (request this when dropping off), with the right software you can enhance your memories with subtle music and subtitles.

London Drugs offers a duplication service to help you hang on to those memories. Just bring your VHS—or mini DV, or Video8, Hi8 or Digital8—in to the Photolab at London Drugs, and the staff coordinate the content transfer.

The cost is $40 per hour of tape, and you’ll receive the content back as digital files on DVD. If you want it in an editable format (i.e. importing into Movie Maker or iMovie to add music) let the staff know when you bring in your tapes. The process takes about 3 weeks, from drop off to pick up.

Before your family memories get a second older, get them transferred professionally at London Drugs.

Tech Talk – How to Avoid Digital Distractions


Julian Sanders from London Drugs talks about how to avoid being distracted both at work and home when trying to get things done. Information for parents about how to keep kids safe online and on task when trying to do school work.

High Key Portraits: A Home Experiment

You may not be familiar with the term, ‘high key photography,’ but you certainly have seen high key images. Imagine an ethereal photo of a baby on a white blanket, or a bride glowing against a brilliant background. High key images have a bright, blown-out white background with minimal shadows. This makes gentle and uplifting portraits that convey a positive mood.

Professional studios often use high key techniques to shoot portraits, but we wanted to see if an amateur photographer could get a similar effect.

The Experiment: Can an amateur photographer take a high key photo?
We enlisted an amateur photographer with an entry-level DSLR camera (a Nikon D5000) and a basic external flash, and we gave her an assignment: using items from around the home, set up a makeshift studio to take high key portraits.


The Set-Up:
A window serves as a diffuse light source (the window is to the right, outside of the frame). Our amateur photographer used a lamp using a cold fluorescent lightbulb for a backlight, positioned at an angle to the window. Two white sheets serve as a backdrop.

You will need:

  • A white backdrop: Our test shot was done against two white sheets tacked against a bookshelf, but anything white will do. For a smooth, seamless backdrop, professional muslin or paper comes in brilliant white.
  • A large, diffuse light source: This makeshift studio is in a bright room with large, south-facing windows (the windows are to the right of photo, not shown). If the sunlight through the window creates harsh shadows, cover the window with a white curtain or sheet to diffuse the light.
  • A backlight: an essential element of high key photography is a brightly illuminated background, so you will need a very strong light to blow out the shadows. In our sample setup, the lamp provides adequate light. For a better effect, a small studio light would put out brighter, whiter light.
  • A good quality flash: Here’s where a small investment will really pay off. External flashes fit right over your camera’s hot shoe and provide stronger, better quality light than the in-camera flash.
  • Editing software: Without expensive studio lighting, it will be difficult to capture high key images with just your camera. Our photographer found that edits were necessary to fix the white balance, enhance the exposure, and increase the brightness. Basic editing software is available free on the web; more comprehensive editing software is available at reasonable prices through London Drugs Computer Department.

Your high key photo shoot, step by step:

  1. Set up your studio space, including props, if you wish. Since our amateur photographer was shooting children, she used white stuffed animals that were close at hand.
  2. Opt for white or light-coloured clothing. High key photography minimizes contrast, so the clothing should not distract.
  3. Set your camera to save in JPEG + RAW. RAW files are like a digital negative, which means no processing or alterations are made by the camera’s software. You will likely have to alter your high key photos after you shoot, and RAW files are the best way to do this.
  4. Start shooting. Look for obvious shadows in the image and try to eliminate them by adjusting your light or your camera’s position. Your initial files will likely not have the full impact of a high key photo—you can easily fix this during photo editing.
  5. Edit on your computer. There are many good photo editing programs on the market. This photo was edited using Photoshop Elements by cropping, then adjusting the white balance, exposure, contrast, and clarity. The total edit time took about 10 minutes.


Another shot, a little more stylistic.

Finally, the lamp was swapped out for an entry level studio lighting kit, improving the backlighting. The following photo required very little editing.

Experimenting with high key photography can give you delightful portraits that are as unique as their subjects.

October is the perfect month to take family portraits, test photo editing, and create custom cards that will be ready in time for the holidays.

Four Seasons: A Photo Project

In Canada, photography is closely linked to the calendar. Think about the colours and moods of the different seasons—fresh green in spring, bright and bold in summer, crisp and orange in autumn, and frosty white in winter. The seasons affect every Canadian photographer, regardless of the subject. Parents filming kids are influenced by the light and weather just as bird enthusiasts, wildlife photographers, travellers, and college students. We are a seasonal nation, and it shows in our pictures.

The seasons affect photography primarily because of light. Canada is a country of dramatic light: in the summer it is bright and overpowering, in the winter, glaring off the snow, it is bouncing and unpredictable. In the spring and fall, the strong, directional light and unpredictable weather patterns create their own challenges. To be a photographer in Canada, you must think about the season, and therefore think about the light.

Looking back at 2011
As 2011 winds down, we have the perfect photography project for you: group your photos, season by season, and look at the light. With digital albums, this is very easy to do.

  1. Look at your photos sequentially, season by season, looking for light quality. Look for skin tones, shadows, glare, and crispness.
  2. Don’t pay attention to how you look. When we look at photos of ourselves, often our photographer brain shuts off. Am I blinking? Should I lose 10 pounds? Do I have a mouthful of potato salad? Forget about it. For this project, you are looking only at light and photo quality.
  3. Pay attention to the failures. Do your ski holiday photos look murky? Your beach shots dark? Your winter birthday parties over-exposed by the flash? Think about what went wrong—often a bad picture could have been transformed if the white balance was adjusted, the subject was angled differently with respect to the light, or you used (or didn’t use) a flash.
  4. Note the type of shots that worked. Perhaps you shot a group photo in the shade during the summer—no one was squinting, no one was in shadow, the group looks cohesive, happy, and interesting. Your successes, season by season, will lead to more successes next year.
  5. Print your successful shots. A picture’s impact can be significantly different on paper than it is on the screen. Colour, proportion, everything can appear differently in print. We encourage you to get your best shots off your hard drive and onto paper, whether you make simple prints, compile them into a photobook, or make a custom calendar—more on this later.

Looking forward to 2012
Year to year, we are faced with the same type of photographic challenges. Skiers will shoot winter photos, those born in November will have indoor birthday parties, the lake by the cabin will continue to reflect light in a weird way.

  1. Now that you’ve reviewed all of your 2011 photos, create a calendar of your best photos from 2011.
  2. In each month, note what you have learned: a bed of cherry blossoms makes a spectacular backdrop, Halloween pictures are best shot during the day; the family reunion picture is best when taken from above.
  3. Our Home Edition calendar software gives ample room for comments. Write them in, so you will remember your thoughts when Autumn 2012 rolls around.
  4. After completing and sending off your Seasonal Photo Project to be printed, go back and change the notes. Write regular photo captions, add birthdays and special celebrations, and print out a second version for gifts.

Our unique, cyclical light is what gives Canadian photographs their charm. We encourage you to look at your light, learn what works, and take even better pictures in 2012.

« Previous Page Next Page »